I recently signed up for Private Internet Access – a well regarded VPN service for just $7 a month and $3 a month if you pay for a year in advance. It’s easy to set up, gives me access to a large number of servers across the world, has excellent bandwidth, and the provider keeps no logs of user activity. Perfect for privacy conscious people especially in today’s world where snooping seems to be the norm.
But I had some trouble getting it to work on Chrome OS with my new Chromebook – mainly because I’m new to the whole VPN scene and didn’t know how to go about it. I finally got it to work in the end and it was pretty easy. You just need to know how.
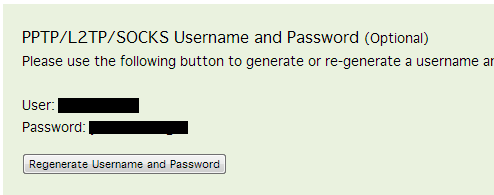
Generate the L2TP Username and Password
First sign into your Private Internet Access account using your VPN username and password. Towards the bottom, you’ll see an option to generate an L2TP username and password combination. This was the key step I missed in my initial efforts. We’re not going to use the VPN login details, but these. You can regenerate it as many times as you want. Here’s a screenshot:
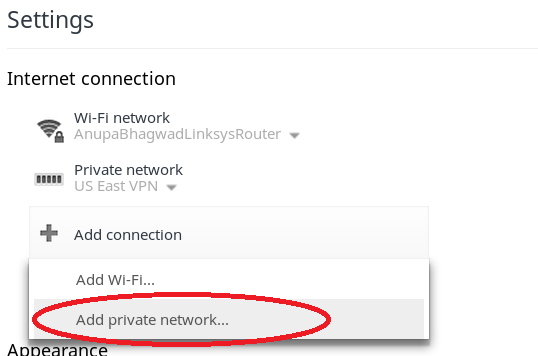
Create the VPN on Chrome OS
On your Chromebook, click the “Settings” option on the pop up on the taskbar. Under the “Internet Connection” section, hit “Add Connection” and “Add Private Network”.
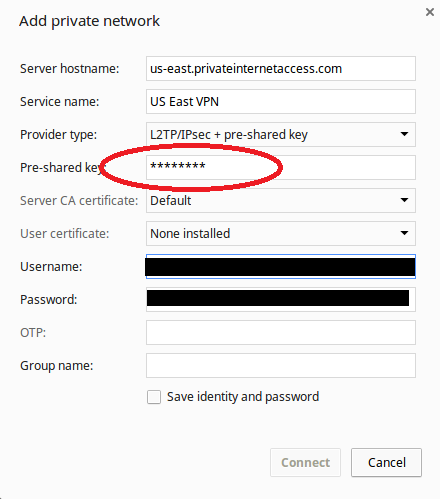
Next, fill in the details as in the screenshot below. Change the “Server hostname” to any one of the VPN servers available in the list here. In my example, I’m connected to the US-EAST server. Change the “Provider type” to L2TP/IPsec + Pre-shared key and in the “Pre-shared key” value, type mysafety . Finally, enter the username and password that were generated for you in the first step.
Hit “Save identity and password” and click “Connect”. When successful, your Wi-Fi icon at the bottom right should change permanently to include a little “chain” underneath it like in the following screenshot:

And that’s it! You can now safely use your Chromebook at any unsecured Wi-Fi location, happy in the knowledge that you have an unbreakable private high speed connection to a number of servers around the world!
Thank you for the informative post. My apologies for accidentally hitting the wrong box (the one that said you’re an ……).
In reply to Sharon
I successfully connected a chromebook with PIA, however now I’m at a different Wi-Fi location, and can’t select a new Wi-Fi network. Does this have something to do with what I did to set up the PIA? Any idea on how to make this work?
In reply to Sarah
I don’t think it’s related. At least I’ve personally never had a problem selecting new wi-fi networks…
THANK YOU! This has been driving me crazy and I couldn’t figure it out! Now I can watch the next episode of Revenge ;-)
TOTALLY THANKS, DUDE! This is SO helpful. Thanks for not only taking the time to do this, but also to provide very clear details. Excellent.
THIS IS WHAT I WAS MISSING!
I had been trying to connect for weeks. Not even the PIA on line support told me that I had to use the PPTP/L2TP/SOCKS username and password. I can now connect to my VPN!
Thank you!
Does this method provide for VPN kill switch option to be had? Obviously I do not see an outright button for it but does it inherently switch it on?
Thanks!
Thanks so much. Never would’ve discovered all this without your tutorial. Much appreciated.
Also worth mentioning that the ‘group name’ had to match the server ‘location name’ (e.g. US Chicago). Finally got connected once this synced up with the PIA credentials.
Well done, and thanks for sharing.
I want to install PIA on my HP Chromebook but I already have a User Name and Password that was generated for my PC account. Do I use the PC Name/Password or do I have to generate a new one for the Chromebook?
In reply to Joe Perry
I think the same one should work just fine…